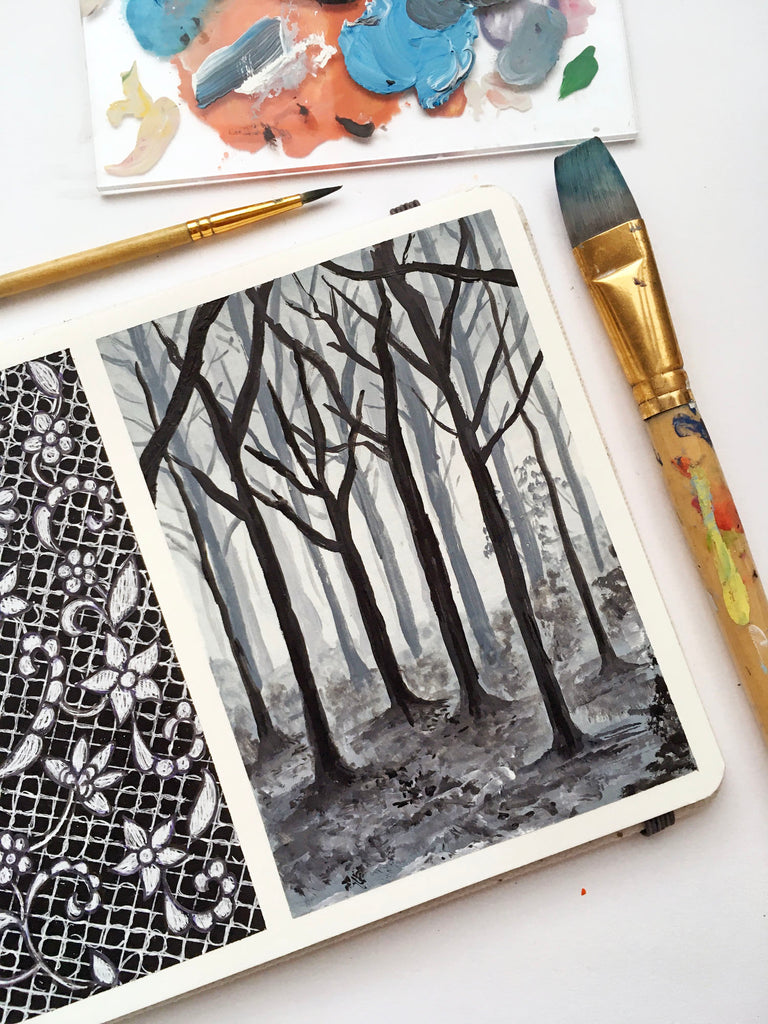
The other painting I did for Week 1's Prompt, Dark & Light, is this spooky misty/foggy forest scene using gouache!
I had seen a few ways to create a foggy look and decided to use the same shade of grey and layer them from light to dark to create the effect (instead of letting the paint dry and going over with white paint--seemed like there was a lot of room for error that way!) It was really fun to watch it come together (and also a little scary because I hadn't done this before and wasn't sure how it'd turn out!) and as a newbie gouache user, I'm really loving the look of this paint!
If you like this painting and want to try it out, I hope you do and below are the materials I used along with the process. I hope it helps!
You can watch a short video of the process on Instagram--I really like seeing all the layers come together on this one!
Tip
Don't forget to add water to your paint to get the right consistency! This can take a bit of trial and error. You can test it out first on a scrap piece of paper until you figure out the right amount of water you need to add to your paint.
You'll Need
-
Masking/washi tape
-
Gouache paint in black, white, and a shade of dark blue
-
Small round brush
-
Medium flat brush
-
Water
-
Paper towel/rag for blotting brush
-
Inspiration photo for reference (Unsplash is a great site for free photos!)
Process
- Tape the edges of the paper to create a clean white border.
-
Start by creating the background. Using the flat paintbrush, create a medium blue grey color and apply it to the bottom and top of the page.
-
Then use white to blend the colors together to create a smooth transition between the shades. Keep the bottom quarter/third of the paper darker--this will be the ground.
-
Add the first layer of trees in the background using the small round brush. Mix a light grey shade and paint vertical lines that end at the top of the ground. Vary the thickness of the lines but keep them thin. They don't have to be perfectly straight since trees aren't perfectly straight! Add some branches coming out of the tree trunks.
-
Using the flat brush and the same light grey color, add texture to the ground by dabbing the brush and creating texture with the bristles. You can also add some highlights with white or shadows with a darker grey.
-
Using the round brush, add a second layer of trees using a darker grey color and extend the tree trunk lower to make it look closer to the foreground. Add some branches.
-
Using the round brush, add a final layer of trees in the foreground. Use the darkest shade of grey and/or black. Extend the tree trunk close to the bottom edge of the paper. Add branches.
-
Blend in the bottom of these trees/trunk to the ground by using the flat brush and blending it out using short horizontal strokes. Add some darker specs to the ground to create depth.
-
After your painting is dry, peel off the border tape.

Here's my full sketchbook page for the first prompt! You can find a tutorial on how to create the lace pattern in this blog post.
If you’d like to join in on this month’s weekly prompts, you can find them here.
I’m also very excited to be offering a newsletter subscription centered around creativity for the upcoming year--if that's something you're interested in, join Atiliay Notes so I can give you a heads up when it launches!